
Avoid AHJ Callbacks: 3/4 in FRT Plywood Backboard Spec for Facility/IT
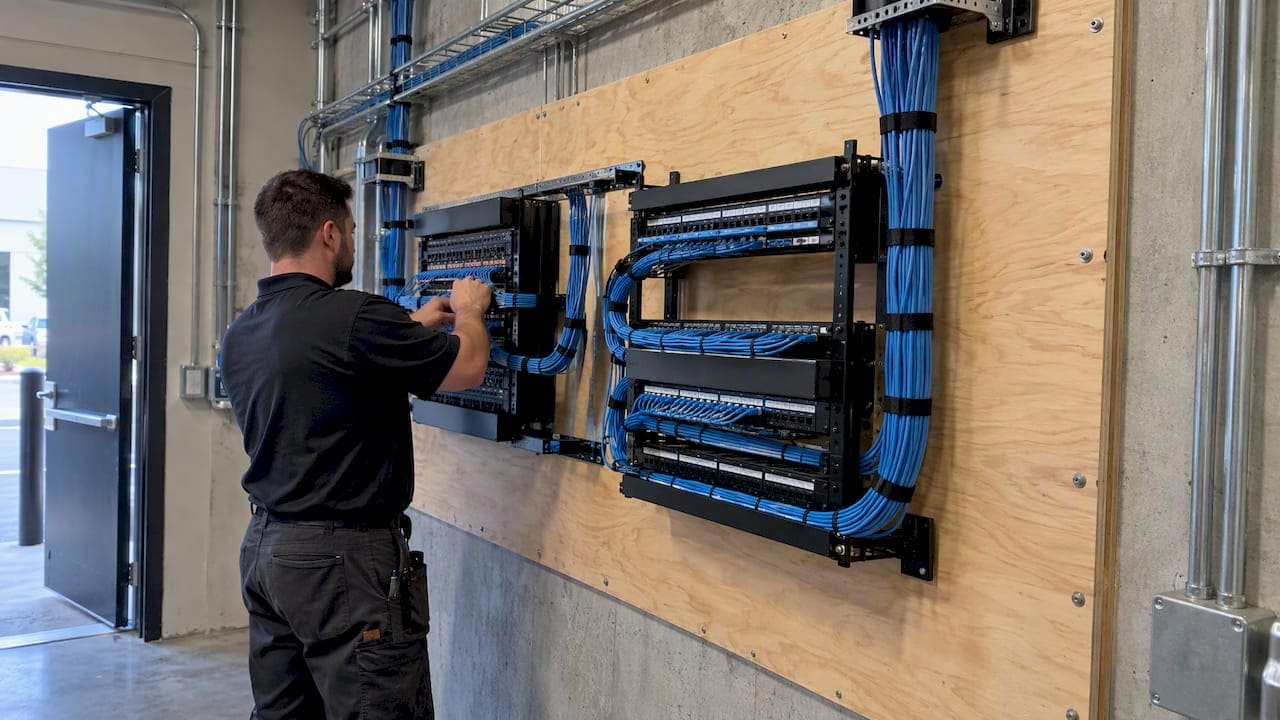
Use 3/4-inch A/C-grade fire-retardant-treated plywood in 4-foot by 8-foot sheets, painted light color on all faces with the fire-rating stamp left visible, mounted vertically starting near 6 inches above finished floor and secured on a standard fastener schedule. Before ordering panels, confirm the local AHJ’s position on FRT documentation and verify the grounding busbar bonding path, since both items commonly trip up otherwise compliant installations.
TL;DR:
- Use 3/4-inch A/C-grade fire-retardant plywood with the fire-rating stamp visible and mounted at least six inches above the floor unless specified otherwise.
- Confirm the AHJ’s position on FRT documentation and ensure bonding paths for the grounding busbar are properly established before installation.
- Specify the panel’s face orientation, finish with light-colored paint covering all faces and edges, and ensure fasteners are evenly spaced and flush to prevent future issues.
- Place the grounding busbar at the lower left corner of the backboard, bonded according to ANSI/TIA-607-D, and coordinate outlet placement and electrical grounding with licensed electrical contractors.
- Regularly inspect the fire rating stamp, grounding connections, fasteners, and moisture levels, scheduling annual checks to maintain compliance and detect early signs of deterioration.
Spec Checklist for Plywood Backboards
Facility and IT teams can lift the following directly into a bid package or design document. These numbers reflect what we see called out across Division 27 specifications and manufacturer guidance for telecom and network rooms.
- Panel size and grade: 3/4-inch thick, 4-foot by 8-foot sheets, A/C grade or better, oriented with the A side facing out (APA).
- Fire treatment: factory pressure-impregnated fire-retardant-treated (FRT) plywood, with the manufacturer’s rating stamp documented and preserved.
- Finish: light-colored paint on front, back, and all edges, applied without covering the fire-rating stamp.
- Mounting height: base typically set 6 inches above finished floor, with panels running to 8 feet or 8 feet 6 inches depending on room design (UMN Division 27).
- Fasteners: a minimum of five fasteners spaced evenly along each vertical edge and down the centerline, flush to the surface.
This list covers the baseline. Specific projects, especially secure facilities or rooms with unusual humidity exposure, often need adjustments layered on top.
Materials, Plywood Grades and Standards to Specify
Specifying the right grade and standard language up front avoids substitutions that technically meet “plywood” but fall short structurally. A/C grade plywood, with the smooth A face oriented outward, gives installers a clean surface for labeling and equipment mounting while keeping the rougher C face against the wall. Some budget-driven specs allow C-D grade, but we recommend A/C or better wherever equipment will be labeled, drilled, or viewed by visitors and auditors.
Procurement language should reference the voluntary product standard PS 1 for structural plywood, which defines grading, veneer requirements, and bond classifications. Two bond classes matter here: Exposure 1, suitable for most interior telecom rooms, and Exterior, reserved for panels facing sustained moisture. When FRT treatment is involved, confirm whether the supplier recommends kiln-dried-after-treatment (KDAT) material, since untreated moisture content can affect panel stability after installation.
- Reference PS 1 by name in the spec, not just “structural plywood.”
- Require A/C grade or better with the A face installed outward.
- Specify Exposure 1 bond classification unless moisture conditions require Exterior.
- Ask suppliers directly whether KDAT is included or needs to be requested.
Fire-Retardant Options, Performance Limits, and Painting
Factory pressure-impregnated FRT plywood differs from field-applied intumescent coatings in both performance and documentation. Factory treatment is baked into the panel during manufacturing and carries a visible rating stamp; field coatings, by contrast, rely on UL-listed products applied after the fact and typically need separate documentation kept near the backboard.
FRT plywood’s low flame spread and smoke development ratings make it acceptable in many telecom rooms where fully noncombustible materials would be impractical, though it remains a combustible material and the AHJ may still ask for supporting paperwork.
FRT treatment can reduce strength under sustained high heat or moisture, so design values should come from the supplier’s certified data rather than a generic assumption. Paint goes on after the panel is installed, in light color, covering all faces and edges, with the rating stamp masked off rather than painted over as detailed in the Complete Guide to Weatherproof Signage Solutions.
Mounting Height, Fasteners, and Substrate Anchoring
Getting the mounting details right the first time saves a return trip. Here’s the sequence we follow on NYC projects:
- Set base height. Mount the panel’s bottom edge 6 inches above finished floor as a default; some specs call for 12 inches, so confirm the governing document first.
- Plan panel height. Run panels to 8 feet, or 8 feet 6 inches where the room design calls for taller coverage, installed vertically rather than horizontally.
- Space fasteners. Use at least five fasteners evenly spaced along each vertical edge and down the panel’s centerline, driven flush with the surface.
- Match anchors to substrate. Concrete and CMU walls need masonry anchors rated for the panel and equipment load; drywall over studs needs lag screws or structural screws driven into blocking, not just drywall anchors.
- Confirm blocking before ordering. Verify stud or blocking locations at the design stage so panel width and fastener layout line up with the wall framing.
For racks, patch panels, or any equipment with concentrated weight, add blocking or a structural support behind the panel rather than relying on the plywood alone to carry the load.
Pro Tip: Mark stud and blocking locations on the wall with tape before the panel goes up. It takes five minutes and prevents a second trip for a missed fastener line.
Electrical Outlet Layout and Grounding Busbar Placement
Backboards don’t function in isolation. Power and grounding placement around them matter just as much as the panel itself.
- Install one 20A duplex outlet roughly every 6 feet along the backboard wall, mounted at 6 inches above finished floor, on a dedicated circuit per institutional telecom standards.
- Label each outlet and circuit clearly for future troubleshooting.
- Mount the telecommunications grounding busbar (TGB) at the lower left corner of the backboard, sized and bonded per ANSI/TIA-607-D.
- Bond racks, cable trays, and cabinets to the busbar using properly sized conductors as per electrical standards and listed connectors.
Coordinate this work directly with a licensed electrical contractor rather than leaving it to the low-voltage crew, since circuit labeling and grounding conductor sizing fall under electrical code jurisdiction.
Room Environment, Clearances, and Cable Tray Dimensions
A backboard installed correctly still underperforms in a poorly conditioned room. Target 64 to 75 degrees Fahrenheit and 30 to 55 percent relative humidity, since FRT plywood’s strength and finish both suffer under sustained high humidity.
- Avoid carpet; specify light-colored, sealed flooring and wall finishes to aid illumination and reduce dust.
- Maintain clear workspace in front of racks and along backboard walls according to common clearance recommendations.
- Run cable tray encircling the room at roughly 8.5 feet above finished floor, with radius dropouts at equipment locations.
- Bond each section of cable tray to ground individually rather than relying on a single connection point.
Field Tips: Moisture Control, Stamp Preservation, and Quality Checks
A few habits separate a clean inspection from a callback. Keep the following sequence in mind on site.
- Hold the panel’s bottom edge at 6 inches above finished floor to limit moisture wicking from concrete slabs and reduce warping over time.
- Paint the backboard before mounting any equipment, masking the manufacturer’s stamp so it stays legible for the inspector.
- Store FRT panels per the supplier’s handling guidance, and confirm whether KDAT reconditioning time applies before the building envelope closes.
- Walk a pre-install checklist covering blocking placement, fastener count, outlet and dedicated circuit presence, bonding conductor routing, and TGB location before scheduling AHJ sign-off.
Pro Tip: Photograph the visible fire-rating stamp before and after painting. It’s a two-minute step that resolves most “unverifiable FRT” questions during inspection.
Field Notes from NYC Telecom Rooms
Most backboard problems we encounter trace back to coordination gaps rather than bad materials. Architectural drawings sometimes spec a backboard location that conflicts with HVAC or structural blocking, which only surfaces once the low-voltage crew is on site. Missed blocking and undersized anchors into drywall are the two most common fastener mistakes we correct.
On our projects, we photograph the FRT stamp and painted panel together and keep that record with the as-built documentation handed to operations, which speeds up AHJ sign-off and future audits.
Inspection and Maintenance Guidelines for Long-Term Compliance
Inspections tend to focus on the same handful of items: the visible fire-rating stamp, outlet labeling, grounding conductor connections, and overall panel condition. Building this into a recurring maintenance routine, rather than treating it as a one-time install check, keeps the room compliant as equipment changes over the years.
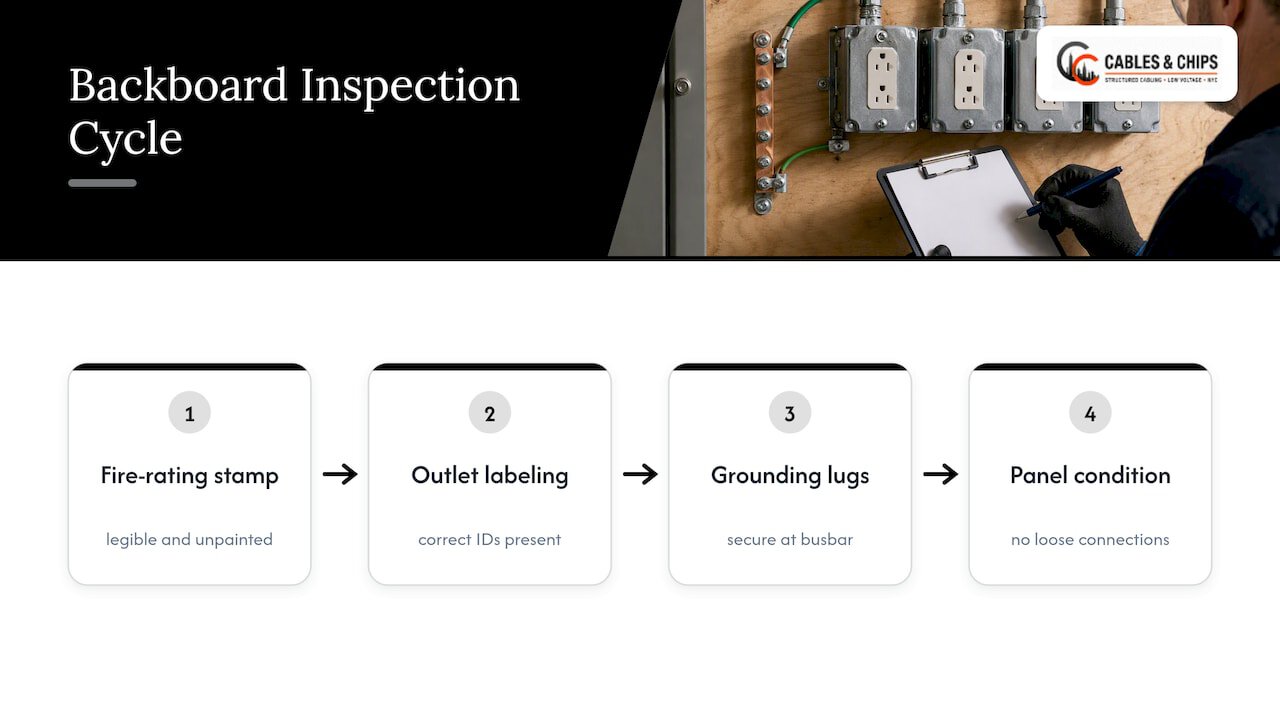
Schedule a visual inspection of the backboard and bonding connections at least annually, checking that the fire-rating stamp remains legible and unpainted, that grounding conductors are still securely terminated at the busbar, and that no new equipment has been added without corresponding blocking or anchor upgrades. Cable tray bonding points deserve the same attention, since vibration and thermal cycling can loosen connections over time.
Document every change to the room, including added outlets, relocated equipment, or repainted surfaces, in the same as-built record used at handoff. When a tenant improvement or equipment refresh touches the backboard wall, verify that new fasteners still land in blocking rather than bare drywall, and confirm the dedicated circuits serving the room haven’t been repurposed for other loads.
Moisture intrusion is the quiet threat to watch for. A slow leak or chronic high humidity can degrade FRT plywood’s structural properties well before any visible damage appears, so periodic humidity readings in the room are worth the five minutes they take. Catching a drift outside the 30 to 55 percent range early is far cheaper than replacing a compromised backboard after equipment is already mounted to it.
Fire-Resistance Requirements Across Building Types and Local Codes
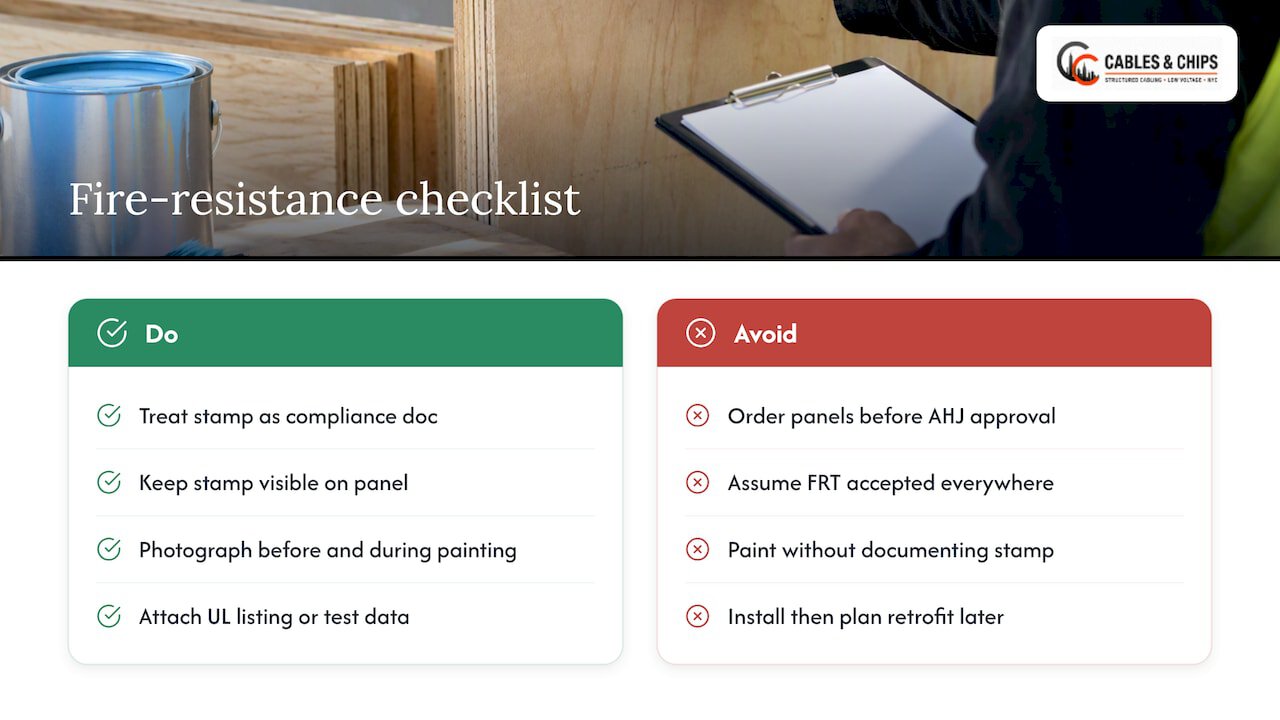
Fire-resistance expectations for telecom room backboards shift depending on occupancy type, and the plywood itself is only one part of the picture. A commercial office tower, a hospital, and a multi-tenant residential building can each apply different code paths to the same physical room, which is why the AHJ conversation needs to happen before materials are ordered rather than after.
FRT plywood’s low flame spread and smoke development ratings make it an accepted choice in many telecom rooms, since fully noncombustible materials are often impractical for a surface that needs to hold fasteners and equipment (APA). That acceptance isn’t automatic everywhere, though. Some jurisdictions and building types require UL-listed field-applied coatings in addition to or instead of factory treatment, particularly in high-occupancy or life-safety-critical spaces.
The practical move is to treat the fire-rating stamp as a compliance document, not just a manufacturer’s label. Keep it visible, photograph it before and during painting, and pair it with a record of the product’s UL listing or test data. When a project involves unusual construction types, mixed occupancy, or a room also serving adjacent life-safety systems, raise the fire-resistance question with the AHJ early, since retrofitting a wall assembly after installation costs far more than adjusting the spec before the first panel goes up.
Structural Load and Performance Requirements
Plywood backboards carry real weight once the racks, patch panels, and cable trays go in, and the 3/4-inch thickness recommended across most Division 27 specs isn’t arbitrary. It gives enough structural margin for standard wall-mounted equipment while still being practical to drill, paint, and handle on site.
The panel alone isn’t the structural system, though. Blocking behind the plywood, aligned with stud or masonry anchor points, is what actually carries concentrated loads like wall-mounted racks or dense patch panel runs. A backboard fastened only to drywall, without blocking tied into the framing, will eventually sag or pull loose under a fully loaded rack, regardless of how thick the plywood is.
FRT treatment adds a wrinkle to structural planning, since treated panels can lose some strength under sustained high heat or moisture exposure, which is why we recommend pulling the supplier’s certified design values rather than assuming standard plywood strength tables apply unchanged. For rooms carrying unusually heavy equipment, such as dense server racks or large UPS units mounted directly to the wall, it’s worth discussing with a structural engineer whether the backboard needs additional blocking or a dedicated support frame rather than relying on fasteners alone.
Why a Tight Spec Saves Time on Inspection Day
Most inspection failures we see trace back to vague plywood language in the design documents, not bad installation work. Writing the grade, fire treatment, and mounting details into the spec up front, and raising unusual humidity or exposure conditions with the AHJ early, prevents the costly second visit.
— Ken
How Cables & Chips Supports Telecom Room Fit-Outs
Specifying the right plywood backboard is one piece of a larger telecom room build, and we handle that full scope for commercial clients across New York City. Our team coordinates backboard installation alongside the systems that depend on it.

Our relevant services include structured cabling installation and design, cable testing and certification, network closet organization, grounding and bonding coordination, and documentation for inspections and operations.
If your next project needs a backboard, a telecom room fit-out, or a full structured cabling build, request a site survey and we’ll scope it with you directly.
FAQ
What thickness should a plywood backboard be?
Three-quarter-inch plywood is the standard thickness called out across Division 27 and institutional telecom specs. It gives enough rigidity to hold fasteners, racks, and patch panels without excessive flex.
Do telecom backboards need fire-retardant-treated plywood?
Most specs require FRT plywood because its low flame spread and smoke development ratings make it acceptable where noncombustible materials aren’t practical. Confirm with your local AHJ, since some jurisdictions have additional documentation requirements.
Can I paint over the fire-rating stamp on a backboard?
No. The stamp needs to stay visible and legible for inspection, so painters typically mask it off before applying light-colored paint to the rest of the panel.
How high should a plywood backboard be mounted?
Most specs set the base 6 inches above finished floor, with panels running to 8 feet or 8 feet 6 inches depending on the room design. Some institutional standards use a 12-inch base instead, so check the governing spec first.
Where should the grounding busbar go relative to the backboard?
Institutional telecom standards typically place the telecommunications grounding busbar at the lower left corner of the backboard, bonded per ANSI/TIA-607-D with appropriately sized conductors.
Sources
- Fire-Retardant-Treated (FRT) Plywood — APA The Engineered Wood Association
- Building Standards DIVISION 27 – COMMUNICATIONS (University of Minnesota)
- University of Florida Telecommunications Standards (sample institutional standard)
- Fire-Retardant-Treated Wood: Guidelines for Using Design Considerations (USDA Forest Products Laboratory)
- Voluntary Product Standard PS 1 — Structural Plywood (NIST / APA reproduction)