
Server Room Cable Management Setup: A Pro Guide
A poorly executed server room cable management setup does not just look bad. It causes real operational damage: slower troubleshooting, blocked airflow, degraded signal integrity, and failed compliance audits. For IT professionals and facilities managers responsible for keeping infrastructure running, the difference between a documented, organized rack environment and a tangled mess can mean hours of downtime versus minutes. This guide covers the full process, from planning and tray selection to rack execution and ongoing maintenance, with the specificity that actually helps you get it right.
Table of Contents
- Key takeaways
- Planning your server room cable management setup
- Choosing and installing cable trays and managers
- Structured cabling best practices in the server rack
- Maintaining and auditing your cable management setup
- Troubleshooting and common mistakes
- My perspective on server room cable management
- How Cables can support your infrastructure
- FAQ
Key takeaways
| Point | Details |
|---|---|
| Plan before you pull cable | Map rack layout, equipment density, and cable pathways before installation to eliminate costly rework. |
| Separate power and data paths | Use dedicated trays for each to prevent electromagnetic interference and heat buildup. |
| Follow fill ratio rules | Keep cable managers at 50% capacity and trays with 30% space reserved for future growth. |
| Label both ends of every cable | Consistent labeling reduces mean time to repair and prevents misidentification during incidents. |
| Update documentation within 24 hours | Port mapping changes left undocumented longer than 24 hours create compounding maintenance problems. |
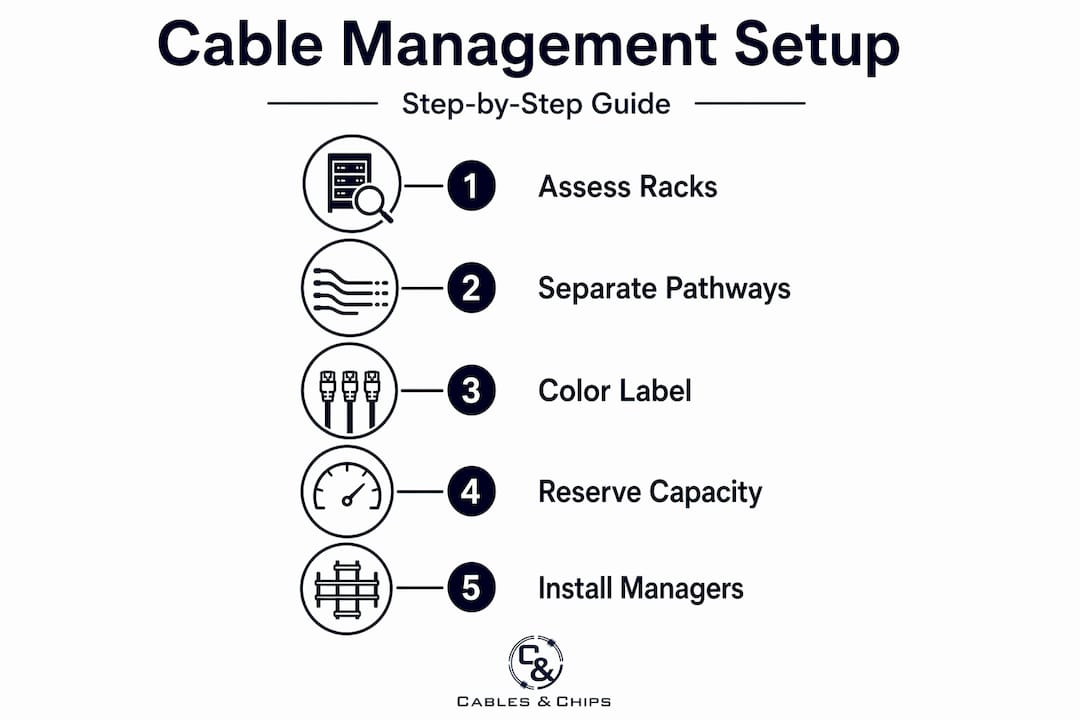
Planning your server room cable management setup
The most expensive cable management mistakes happen before a single cable is pulled. Roughly 80% of cabling effort belongs in the permanent infrastructure planning phase, not in patch cord management. That ratio tells you everything about where your time should go first.
Start by assessing your rack layout and equipment density. Know exactly how many U positions are occupied, what active equipment is present, and where cables will originate and terminate. From that baseline, design your cable pathways before installation begins. A server rack installation that accounts for cable routing upfront will always be cleaner and more serviceable than one retrofitted later.
Separate power and data cable pathways from day one. Running them together is the fastest way to introduce electromagnetic interference. Design distinct horizontal and vertical routes for each, with physical separation maintained throughout. This is not just a best practice. It is a compliance consideration under several building and electrical codes.
Color coding and labeling schemes are equally non-negotiable at the planning stage. Standardized cable colors and labels reduce misidentification errors during maintenance and dramatically cut troubleshooting time. Choose a scheme and document it before any hardware is racked.
Pro Tip: Reserve 30% of your tray capacity and keep cable managers at a maximum of 50% fill when planning. Facilities that plan for moves, adds, and changes from the start avoid costly tray replacements within 18 months of going live.
Here is a comparison of the core planning tools and accessories you will need:
| Tool or accessory | Primary use | Notes |
|---|---|---|
| Horizontal cable manager | Routes patch cords between panel and switch ports | Size to match your patch density |
| Vertical cable manager | Manages slack and routes cables between rack units | Essential for 42U and taller racks |
| Label printer | Produces consistent port and cable labels | Use heat-shrink sleeves for fiber |
| Velcro hook-and-loop ties | Bundles cables without crush damage | Mandatory over zip ties |
| Cable color-coding kit | Identifies cable type or circuit at a glance | Document your scheme in writing |
Choosing and installing cable trays and managers
Selecting the right tray type is one of the most consequential decisions in a server room cable management setup. The wrong choice either restricts airflow or fails to protect cables from physical or electromagnetic stress.
Wire mesh trays are the preferred choice for data cables. Their open structure improves airflow and allows easy cable access without disassembling the tray. Ladder trays are better suited for power cables because they handle heat dissipation and provide the physical separation needed to reduce EMI. Solid-bottom trays should be avoided in most server room scenarios. They accumulate heat and complicate any future moves or additions.
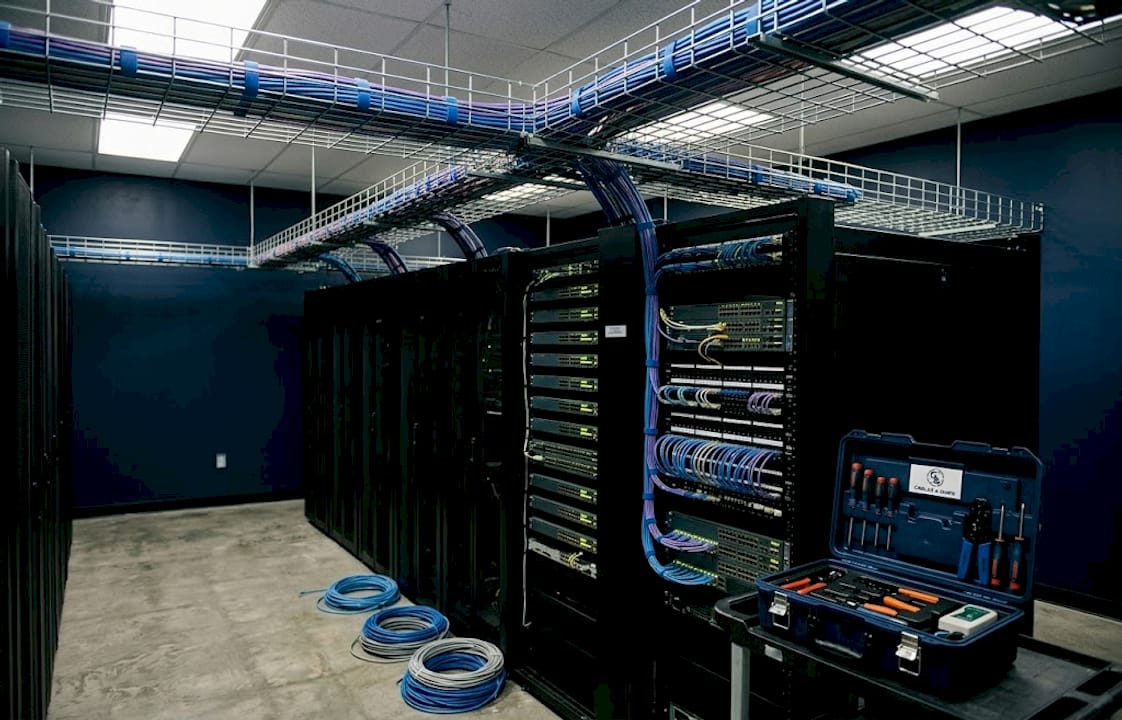
When installing trays, airflow takes priority. Open architecture trays enhance heat dissipation and work well in hot aisle/cold aisle configurations because they do not interrupt the airflow path between equipment and the cooling return. Any tray that blocks the cold air supply path or obstructs hot exhaust is a liability.
A few installation requirements that matter for compliance and long-term reliability:
- Support spacing should not exceed 5 feet for standard wire mesh trays to prevent sagging under cable load
- All cable trays require electrical continuity maintained with bonding jumpers and grounding below 1 ohm resistance to the rack ground
- Keep tray fill within the manufacturer’s rated load capacity, which is usually expressed in pounds per linear foot
- Horizontal trays in the overhead space should be sized 20% larger than your current calculated fill to accommodate additions
Pro Tip: When routing above racks, keep data and power trays on opposite sides of the overhead pathway. A 12-inch separation is the minimum. If your room layout forces them closer, use shielded conduit for the power runs.
The goal is a tray system that supports the infrastructure you have today and the growth you expect over the next three to five years. Underspecifying tray capacity is a common mistake that leads to overfilled trays, which block airflow and create heat risks that compromise hardware lifespan.
Structured cabling best practices in the server rack
Execution inside the rack is where planning either pays off or breaks down. Follow this sequence for consistent results:
- Install horizontal and vertical cable managers first, before any active equipment. This gives you a clear routing structure to work with and prevents retrofitting managers around existing gear.
- Measure cable runs before cutting or purchasing patch cords. Add 12 to 18 inches for a service loop. Never stretch cables taut between ports. Tension degrades connectors over time, particularly on fiber.
- Store service loops in vertical cable managers positioned behind equipment, not coiled on the floor or draped over other gear. Proper service loop storage preserves airflow and keeps the front of your rack clean.
- Use Velcro hook-and-loop ties exclusively for bundling. Velcro ties prevent crush damage that zip ties can cause, especially on fiber runs where bend radius violations destroy performance. Zip ties are acceptable only for temporary cable management during installation.
- Follow the 1:1 rack unit ratio for standard copper cabling: 1U of cable management per 1U of active equipment. For high-density MPO fiber environments, increase this to a 1.5:1 ratio to handle the volume and protect bend radii.
- Label every cable at both ends before the next run begins. Mid-installation labeling gets skipped under time pressure and never gets done retroactively. Use a consistent format: location code, rack number, port designation.
- Maintain strict segregation of cable types within the rack. Power cables stay to one side, data cables to the other. If your rack design includes both, use dedicated vertical managers for each category.
Pro Tip: Color-coded CAT6 patch cables by circuit or VLAN give your team a visual shortcut during troubleshooting. When you can identify a circuit by color before touching it, you cut average fault resolution time significantly.
Maintaining and auditing your cable management setup
A well-executed setup degrades without active maintenance. Schedule structured inspections quarterly, or immediately following any significant move, add, or change operation.
The most damaging maintenance failure is documentation rot. When port mapping is not updated within 24 hours of a MAC operation, errors compound. Six months of undocumented changes make your as-built drawings unreliable, which means every future troubleshooting event takes longer than it should. Assign documentation responsibility explicitly, not as a shared afterthought.
Your maintenance checklist should cover the following on every inspection cycle:
- Verify cable fill rates in all trays and managers against the 50% and 70% thresholds
- Check that all Velcro ties are intact and none have been replaced with zip ties
- Confirm no cables are routed across hot exhaust paths or obstructing cold air intake
- Review labels for readability and accuracy against the current port map
- Inspect tray grounding connections and confirm continuity below 1 ohm
- Identify any cables added outside of documented change management and reconcile them
Bulk patch cable storage outside the server room is a detail many facilities overlook. Storing patch cables inside the server room creates clutter and introduces fire load unnecessarily. Maintain a dedicated IT storage area outside the room for spare cable inventory.
For ongoing cable cleanup and network closet organization, professional MDF/IDF cleanup services can reset a degraded environment back to a maintainable baseline faster than internal teams working around live infrastructure.
Pro Tip: Photograph every rack from the front and rear immediately after completing a cleanup or new installation. Date the photos and store them with your as-built documentation. This baseline image becomes your reference point for every future audit.
Troubleshooting and common mistakes
Even well-planned environments accumulate problems over time. Knowing where failures typically originate helps you address them before they cause outages.
Mixing power and data cables in the same tray or pathway is the most common and costly mistake in server room cable management. The resulting EMI degrades signal quality gradually, producing intermittent errors that are difficult to trace without proper segregation documentation.
Overfilled cable trays are another persistent problem. When trays exceed their fill capacity, two things happen: airflow is compromised and future changes require complete tray reorganization rather than a simple add. Neither outcome is acceptable in a production environment.
“The three most expensive words in server room cable management are ‘we’ll fix it later.’ Every temporary workaround that survives past the next maintenance window becomes permanent infrastructure.”
Additional failure points to watch for:
- Excessive cable slack left unmanaged in racks blocks equipment access, obstructs airflow, and creates entanglement risk during moves
- Zip ties on fiber cause microbend damage that degrades signal levels below acceptable thresholds, often well before a hard failure appears
- Unlabeled or mislabeled cables extend incident resolution time, sometimes by hours in complex environments
- No capacity headroom means every addition requires a partial redesign rather than a clean cable pull to an available port
Adapt your setup as infrastructure evolves. A server room cable management setup that matched your environment three years ago may now be running at 90% fill in several trays. Plan for annual capacity reviews tied to your refresh cycle. For scalable cabling infrastructure examples relevant to growing IT environments, it is worth reviewing how organizations have structured their expansion without a full rebuild.
My perspective on server room cable management
I have walked into server rooms where experienced IT teams were genuinely proud of their infrastructure, only to find vertical managers stuffed past capacity, fiber bent at sharp angles around rack posts, and a port map last updated two years prior. The pride was real. The execution was costing them.
What I have learned is that the gap between a clean install and a problematic one is almost never technical knowledge. It is discipline at the maintenance stage. Anyone can build a clean rack. The harder skill is keeping it clean through staff turnover, rushed deployments, and deadline pressure.
The organizations I have seen run the tightest cable environments share one habit: they treat the as-built documentation as a live record, not an installation artifact. Every change gets logged before the technician leaves the room. That single discipline prevents more downtime than any piece of hardware.
My other observation is that cable management pays the most visible dividends during incidents. When a circuit fails at 2 a.m. and your team can trace a labeled, color-coded run in three minutes rather than thirty, every dollar spent on proper setup has returned its value many times over. This is not about aesthetics. It is about operational resilience.
— Ken
How Cables can support your infrastructure

Cables & Chips has executed server room cable management setups across commercial offices, secure facilities, and enterprise environments throughout New York City for more than 40 years. Whether you need structured CAT6 cabling installation from the ground up, high-density fiber optic termination for MPO environments, or a full rack cleanup and documentation rebuild, the Cables & Chips team brings the technical depth and documentation discipline that production environments require. Contact us at 20 Vesey Street in Lower Manhattan or schedule a site survey to discuss your specific infrastructure needs.
FAQ
What is the correct fill ratio for server room cable trays?
Cable managers should be filled to a maximum of 50%, and trays should reserve 30% empty space to accommodate future moves, adds, and changes without requiring a tray redesign.
Should I use zip ties or Velcro ties in a server rack?
Velcro hook-and-loop ties are the correct choice. Zip ties risk crushing cables and are particularly damaging to fiber, where even minor compression can cause bend radius violations and signal loss.
What types of cable trays work best in server rooms?
Wire mesh trays are preferred for data cables because of their airflow characteristics. Ladder trays are better suited for power runs. Solid-bottom trays should be avoided because they trap heat and restrict cable access.
How does cable management affect compliance?
Proper cable segregation, grounding, fill limits, and tray installation practices align with building codes and fire safety regulations. Grounding cable trays below 1 ohm resistance and maintaining clear pathways are both compliance requirements, not just best practices.
How often should server room cabling be audited?
Conduct a full inspection quarterly and update port mapping documentation within 24 hours of any change. Facilities that defer documentation updates accumulate errors that make future maintenance significantly more time-consuming.